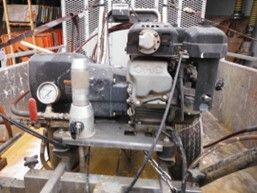
Line Pro Paint Sprayer

Warning:
The use of this equipment may be hazardous. Safety precautions must be observed to reduce the risk of personal injury. It is important to fully understand and observe the following safety precautions and procedures. If not familiar with the use of this equipment refer to the user manual and obtain practical instruction from a competent operator or supervisor. Do not operate without thorough training or unless under the direct supervision of an instructor. Do not operate if safety features are missing or not working appropriately.
Background:
The PC-7700-LP Line Pro Paint Sprayer is used to paint lines on asphalt, cement and other surfaces.
Hazards:
· Injection Injury
· Fire
· Explosion
· Eye Injury
· Respiratory Irritation
· Skin Irritation
· Noise
· Fumes
· Muscle Strains
· Traffic
· Bystanders
Personal Protective Equipment (PPE) Required:
· Safety footwear
· Gloves
· Hearing Protection
· High Visibility Apparel
· Half Mask Respirator or N95 as needed
· Eye ProtectionPre Set-Up:
· Pre-trip paint sprayer and trailer
· Set up traffic control (Set up in accordance with M.O.T.H. Traffic Control Manual for Work on Roadways)
· Make sure that conditions are right for painting
· Wear appropriate PPE.
Start Up Procedure
· Follow all manufacturers guidelines
· Place siphon hose into a container with appropriate solvent
· Place return hose into a waste container
· Check to see that grounding chain on paint cart is grounded to trailer or touching road surface
· Make sure pump is in the “off” position
· Turn on engine, switch and start engine
· Make sure pump is in the “prime” position and turn on pump (Figure 1)
· Run primer until all of the hydraulic oil is drained
· Turn off pump
· Check that pressure control (Figure 1) is set to lowest setting

· Turn primer/spray knob to Spray Position (See Figure 2) At this time make sure spray tip is NOT installed

· Turn pump on
· While triggering spray gun turn up pressure knob until fluid begins to flow and drain out hydraulic oil and solvent appears
· Turn to prime (See Figure 3) turn off pump and turn down pressure control knob

· Place paint into paint cart
· Place siphon hose into paint can on cart
· Place return hose in waste container
· Run on Prime until paint comes out return hose
· Turn off pump and turn down pressure control knob
· Place return hose into paint can with siphon hose
· Turn on pump
· Turn to spray position (See Figure 2)
· Trigger spray gun into waste can and turn up pressure until fluid flows and spray until paint comes out
· Turn off pump and reduce pressure with control knob
· Place primer/spray knob to Prime position (See Figure 3)
· Turn off engine
· Put appropriate tip size in paint nozzle and attach to spray gun
Painting with Cart Procedure:
· Attach spray gun to cart support arm
· Put appropriate tip in nozzle and attach to spray gun
· Check to see that the ground chain on paint cart is connected to ground chain on trailer
· Set down any over spray boards in area to be painted
· Start engine
· Place primer/spray knob to spray position
· Turn on pump
· Set pressure to 1800 PSI
· Using left trigger handle on cart, unlock front wheel to pivot cart to line up paint sprayer, then release handle to lock wheel
· Avoid painting with front wheel unlocked because it can cause line to be erratic
· Push cart then squeeze right handle trigger to start painting
· Release handle while still in motion to stop painting to prevent pooling
· Turn to Prime
· Turn off pump, reduce pressure with control knob
· Turn off engine
Painting With Wand Procedure:
· Remove spray gun from cart
· Remove nozzle from spray gun and attach it to wand
· Attach wand to spray gun
· Set down any stencils or over spray boards
· Start engine
· Turn primer/spray valve to spray position
· In a sweeping motion squeeze trigger and paint lines, stencil or other objects.
· Turn pump on
· Check to see if pressure control is set to 1200-1500lbs
· Turn to Prime
· Turn pump off
· Turn engine off
· Place wand with tip down into solvent can
Post Procedure Shut Down / Clean up:
· Remove spray tip
· Place siphon hose in appropriate solvent – refill as needed
· Place return hose in paint can
· Start engine
· Turn pressure control knobs to lowest settings
· Place primer/spray knob to prime
· Turn on pump and slowing, turn up pressure until fluid comes out of return hose and drain hose of paint
· Turn Pump off
· Turn pressure control knob to lowest setting
· Turn primer/spray knob to spray
· Place spray gun in waste container
· Turn to prime
· Turn on pump
· Squeeze trigger, adjust pressure control until fluid comes out and flushes line thoroughly
· Continue flushing hoses until gun and hoses are thoroughly clean
· Turn off pump
· Set pressure control knob to lowest setting
· Turn off engine
· Remove filter from spray gun and clean with solvent
· Reattach spray guy to hose
· Remove filter body from back of pump and clean and replace all filters
· Remove screen from siphon hose and clean
· Place siphon hose in container of Hydraulic Oil – top up as needed
· Start engine
· Put primer/spray hose in waste container
· Turn to prime
· Turn on pump
· Adjust pressure knob until fluid comes out
· Continue to flush until hydraulic oil comes through
· Turn off pump
· Turn pressure to lowest setting
· Place primer/spray knob to spray
· Turn on pump
· Adjust pressure control until fluid comes out – continue flushing until hydraulic fluid comes out
· Turn to prime
· Turn off pump
· Turn off engine
· Leave filters in place
Summary
· Make sure painter is thoroughly cleaned
· Ensure filters are cleaned well
· Before storing run hydraulic oil through system and leave it in sprayer for storage
· All operators must be trained before using
· Set up proper traffic control as needed
· All clean up should be done outdoors
· Use appropriate PPE at all times
