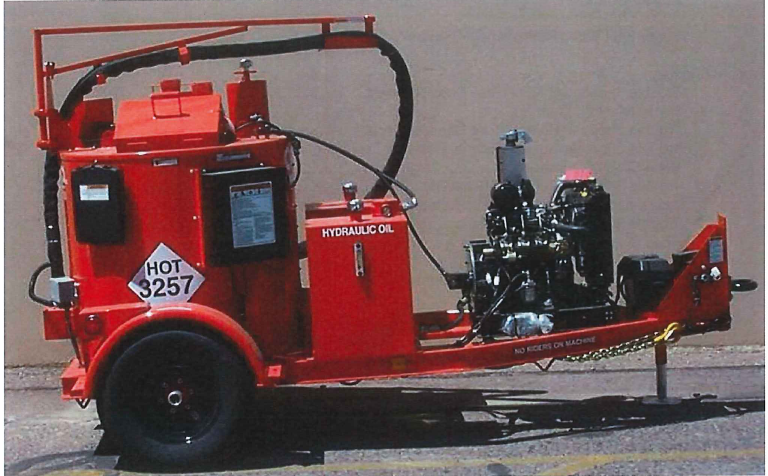
Crafco Crack Sealing Application SWP Unit 736

Summary:
The Crack Sealer (#736) is used to apply hot asphalt sealant to pavement cracks and seams.
· Read and understand operation and safety manual.
· Be aware of the WHMIS and MSDS for sealant, detackifier, etc.
· Always wear appropriate PPE.
· Do not move or bend the hose when it is cold as this can break the heating element.
· Create a Safe Work Zone.
· Be aware of bystanders.
· Keep work area clear of debris and tripping hazards.
· Keep a large cooler of ice water available for hydration and initial burn treatment.
· Once the unit is in operation, all components should be considered hot – use appropriate care.
Hazards:
· Burns
· Muscle Strain Injury
· Traffic
· Respiratory
· Fire
· Sun/heat
· Noise
· Eye injury
· Repetitive strain injury
Personal Protective Equipment (PPE) Required:
· CSA approved Safety footwear
· High Visibility apparel
· Eye protection
· Hearing protection
· Long sleeve clothing
· Sun hat
· Respirator
· Work gloves
Initial Start up Procedure:
· Open vent at top of unit.
· Pre-trip unit – incl. engine fluids, fuel level, hydraulic oil, heat transfer oil.
· Do not move or bend the hose when it is cold - can break the heating element.
· Place cleaned “duck bill” valve on end of wand and tighten.
· Start engine- use preheat for 3-4 seconds if necessary.
· Turn power toggle on to ignite burner – consult manual if it fails to ignite.
· Check Temperature settings (380 o F for material and 475 o F for hot oil).
· Set hose at 380o F until it warms up, then down to 360 o F for application.
· When material in the melter reaches 275 o F, engage the mixer switch (monitor closely as un-melted blocks of sealant will jam the mixer).
· Hose turns on automatically at 275 o F, but won’t dispense product until it is at 375 o F.
· Do not leave hose at operating temperature for more than 30 minutes without dispensing material.
· If the machine is not in daily use, the electric pre-heater can be plugged in the night before initial fire-up.
Work Area Set-Up and Prep:
· Set up safe work zone - use certified traffic control persons if required.
· Check sealant temperature and volume – add sealant if needed (maintain about ½ full).
· Cracks and seams must be clean and dry before filling. Understand and follow the “Hot Air Lance” SWP. Vegetation must be manually removed with a crack hoe before removing dirt and debris with compressed air. Dry with Hot Lance if needed.
Dispensing Sealant:
· Keep wand trigger locked except when dispensing.
· Insert wand tip into top of melter (for a short time). Turn pump speed to lowest setting, depress wand trigger and increase pump speed slightly.
· The nozzle will clear and material will begin to dispense.
· Install application shoe if needed.
· Adjust pump speed to control application rate.
· Use caution as the melted sealant can splatter on start up.
· Spray detackifier over applied sealant before opening to vehicles and pedestrians.
Loading the machine:
· Wear respirator.
· Mixer stops automatically when lid is opened.
· Open lid, place solid sealant on lid and close completely; to avoid splashing, make sure the block has fallen into the mixer before opening lid again.
· Avoid getting water into mixer (it will splatter).
· Keep lid locked except when loading.
Post Procedure/Shut Down:
· Remove applicator shoe and place in container of detackifier for storage (shoe will be hot).
· Place and lock hose and wand in storage holder with trigger locked.
· Check level; should be stored ½ full.
· Reverse pump for approximately 30 seconds.
· Turn off mixer toggle switch.
· Turn power switch off.
· Remove the “duck bill” valve from the end of the wand; remove sealant from it once it cools.
· Shut down engine by turning key to “off”.
· Machine should be stored under cover.
